

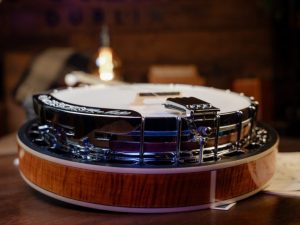
A Beginners Guide For Tuning and Holding The Banjo
All the information you need to know about tuning and holding your banjo for the first time.
This post is an extract from ‘Enda Scahill’s Irish Banjo Tutor – Learn Irish Banjo Vol I’.
This book can be purchased here.
Getting Started: Tuning and Holding the Banjo Properly
Tuning the Banjo
The banjo tuning that we are going to use is the standard Irish Banjo tuning GDAE.
G is the string nearest the ceiling and is the G below middle C.
E therefore is the string nearest the floor. It is also referred to as the Top String being the highest in pitch.
The simplest method of tuning your banjo is to buy a digital tuner. A good quality tuner should suffice. Remember that the picked note will initially reverberate slightly sharp, then true and then slightly flat before returning to the true note. This is a problem with all stringed instruments. Therefore allow the indicator on the digital tuner to settle.
The other option is to tune one string to an instrument such as tin whistle, piano, tuning fork etc and then to tune the other strings from the first string.

Start with the A string. Tune this using your ear to the reference note. This may be difficult at first and the best way to do it is to relax, close your eyes and try to hear if the two notes are the same. Gently adjust the tuning peg on the banjo until you think it matches the reference note. You may find it easier to start with your string flattened below the note you want and to gently ease it sharper and sharper until you reach the correct tuning.
Listening too intently can easily distract and confuse you. Once you have one string in tune you can use this to tune the other strings. Be aware that if the intonation of your banjo is out (i.e if the notes sharpen as you move further up the neck) this method may not work exactly. Initially try tuning the banjo using the 7th frets. The 7th fret on the D string is the note A. Hold down this note and compare it to the open A string that is in tune. Adjust your D string until the 7th fret A is the same as the open A note.
The 7th fret on the A string is high E’ and so on. Tune one string to the other. Eventually, you will be able to tune automatically by ear. Trust your own ear, the ability to tune by ear will develop over time.
Holding The Banjo
The principle behind the way you hold the banjo is that you achieve a comfortable playing position that allows you to align your right and left hands and arms correctly with the banjo.
- Sit with your feet planted squarely on the floor and your back supported
- Seat the banjo on your lap
- Tuck the tailpiece end of the banjo into your right hip allowing space between your left hip and the left side of the banjo rim. The angle between your left hip and the butt of the banjo neck as you look down at it should be around 30-45°
- The banjo should sit in place relatively unsupported. It is important that neither left nor right hand is supporting or holding the banjo to any great extent as this will hinder their movements when it comes to playing. If you need a strap, use one, they are a very useful piece of equipment.
- The neck of the banjo (if looking straight into a mirror) should be at an angle of approximately 45-65° to your body. If the banjo neck is too high toward the shoulder it will cause problems for the right hand placement later on.
- Now relax! It is so important in banjo playing that you relax completely from your shoulders down to your fingers. Tension in the shoulders will impact on the way you grip the plectrum and pick the strings. Tension causes stiff, jerky playing.
The Right Hand
The right hand is the engine of the banjo. If it is forced and strained it will choke up. It is vital to know where to put your right hand on the banjo so that the wrist is supported and the hand moves freely.
First find the “karate chop” part of the hand, it is the area of the hand opposite the thumb. This is part of the hand that rests on the banjo. It is the pivot point for the hand and the support for the wrist. It should be placed on the tail piece or, if you can’t reach, on the strings behind the bridge. This will not affect the tone to any large degree.
Be certain not to touch the bridge as this will dampen the tone. The wrist, which is the hinge for the hand must NOT be arched. Arching causes tension.
A good test to see if you understand how the hand must be supported here is as follows:
- Hold out your left hand in a fist in front of you as a support. Now place your right hand on top of your left hand at the karate chop point of your right hand. Let your right arm flop down and now wiggle your right hand back and over from the wrist. The left hand is the tailpiece of your banjo and this is exactly how your right hand and arm should be supported on it.
Regarding the rest of the arm, imagine a straight line running down the neck of the banjo, along the strings, down the hand and wrist and down to the elbow. It will not be completely straight or even close, but it is a good guideline. Do not move your arms, shoulders or back to achieve this “straight line” – move the banjo or the banjo neck up or down or out.
Now check that the right hand is placed so that is is aligned with the strings. The right hand should comfortably “cup” the bridge. This is so that the natural movement of the wrist will cause the hand to evenly cover all four strings. Again, adjust the banjo to meet your hand not the other way round.
You should pick the strings approximately 1″-2″ from the bridge. It depends on the individual banjo where exactly the nicest tone is; very close to the bridge tends to be very tinny and if you go too far towards the neck you can’t keep the right hand in place.
Holding The Pick
I. Loosely curl in the index finger
2. Place the pick on the outside edge of the curled index finger pointing downwards along the second section of the finger
3. Now place the thumb over the pick evenly covering the pick with the flat of the thumb at the soft pad area of the thumb. Try to keep the thumb straight and not bent at the joint, making certain the thumb is relaxed
The weight of the thumb should be enough to keep the pick in place. When trebling or playing quickly the pick should be loose enough to flicker back and forth between thumb and finger. DO NOT SQUEEZE!
The method of holding the pick between the flat of the index and middle fingers and the thumb (like holding a pencil) is not recommended as the opposing action required by the fingers and the thumb to hold the pick in place causes lots of tension.
NEVER place any fingers on the velum as a support. It is fine to allow the fingers of the right hand to rub limply off the velum or keep them curled up neatly. To place any of the fingers on the velum or curled around the bridge again causes unneeded tension.
The Left Hand
Placing the Left Hand
The left hand should lightly cup the neck of the banjo so that the neck sits in the “crook” of the hand between thumb and forefinger. The palm and butt of the hand should be well away from the neck and not flat against it in a supporting role. If the neck is falling away or down use a strap. The left arm should be relaxed and natural and not sticking stiffly out at the elbow.
Left Hand Technique
What we want to achieve with the left are light, nimble fingers.
Remember to hold the neck of the banjo in the crook of the left hand keeping the fingers nice and high above the fingerboard. Don’t squeeze with your thumb; allow the hand to be free enough to move up and down the neck.
The fingers of the left hand should resemble a claw shape. This keeps the fingers upright and ready for action. Flattening the fingers makes it much harder for them to move around quickly and they will also touch off the other strings.
Always place the finger that you are using for a note squarely in the centre of the fret and press down firmly.
Keen your fingers close to the strings so that they are readily available for use. Don’t have them wiggling about in midair!
A wonderful extract from ‘Enda Scahill’s Irish Banjo Tutor – Learn Irish Banjo Vol I’ .
This book can be purchased here.


![How Much Does a Banjo Cost? [2026]](https://blog.mcneelamusic.com/wp-content/uploads/2025/10/Gemini_Generated_Image_6z9ni96z9ni96z9n-300x171.png)

Share your thoughts
Hi I would like to learn to play the banjo, I'm a beginner not played any instruments before I have enjoyed the sound of the banjo and would like to begin learning how to play if you could inform me of the process to begin. Many thanks
Hi Dinah, great choice. You'll enjoy this beginner's guide to buying a banjo - it has plenty of tips on how to get started and which banjo to buy. Let us know if you've any further questions.